09/01/2012, Copyright 1998-2012.
Return to the Feature Index.
-
Few things in the vintage guitar market are as confusing
as Fender and Gibson custom color guitars. The number of colors offered and
lack of good, clean, documented specimens today makes identifying the
original colors difficult. Many authors of some excellent guitar books
have shed light on Fender and Gibson custom colors. Though I
greatly appreciate this current research on custom colors, I feel they may
have created some general confusion as to what color is what. Also, as a
guitar refinisher, being able to duplicate the original custom colors
accurately is important to me. And the information I've seen to date isn't
complete or accurate enough to allow this. So I've done my own research and
have found quite a few things that differ from the accepted custom color
knowledge base. For example, takes these quotes from several popular
vintage guitar books:
- "1958 Strat in Shoreline Gold with gold parts". (this caption is actually describing a "true" one-off custom color, not Shoreline Gold. Shoreline Gold is very bronze in color and wasn't even available till 1959).
- "1961 non-tremolo model in Coral Pink, a subtle variant of the world famous Fiesta Red finish". (Fender never had a color in its pallet called "Coral Pink" or "Salmon Pink". This color is mostly likely Fiesta Red, which has a very pink hue).
- "Some colors changed in 1963, but the total stayed at 14. Some, such as Shoreline Gold and Inca Silver, changed in name only." (Shoreline Gold and Inca Silver were dropped in 1965 and replaced by Firemist Gold and Silver, completely different colors).
- "Foam Green is related to Surf Green but is a bit lighter". (actually Surf Green is lighter in color than Foam Green).
- "Enamel lacquers were marketed by DuPont under the Duco brand; acrylic lacquers bore the Lucite brand". (Duco is DuPont's brand name for nitrocellulose lacquer. There’s no such animal as an "enamel lacquer").
As you can see, custom colors may be one of the most mis-understood aspect of the vintage guitar market. The following research can provide more accurate information on the custom color paints and finishing techniques used. This may help you better identify a true factory custom color, and should clear up the many fallacies about them.
Cars, Cars, Cars.
-
To understand Fender custom colors you have to know what the colors are
based on. The answer, of course, is automobiles. Cars in the United
States had more social influence than just about anything at the time
(even more than Elvis). Fender's only in-house paint mixes during the
50's and 60's were Sunburst and Blond (and Candy Apple Red to a point:
more on this color later). All other colors originated directly from the
cars of the time, and most of these colors were from General Motor's cars.
Let me back up and tell you exactly how I researched this. I've been doing car and guitar finishes since I was in high school. And I constantly get guitar clients asking for the wide array of Fender colors that were offered during the 1960's. But I always turned them away from doing all colors except those I could accurately reproduce: white, black, and blond. After all, white is white and black is black, and everyone has seen a million blond Teles. It's pretty hard to screw up those colors. Finally I decided to do some research on the other colors.
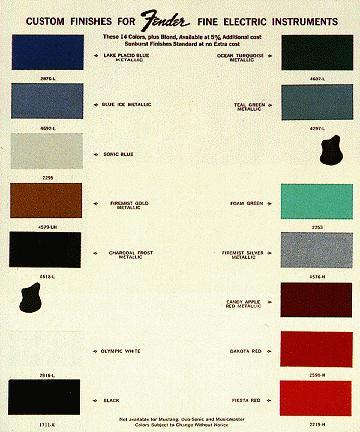
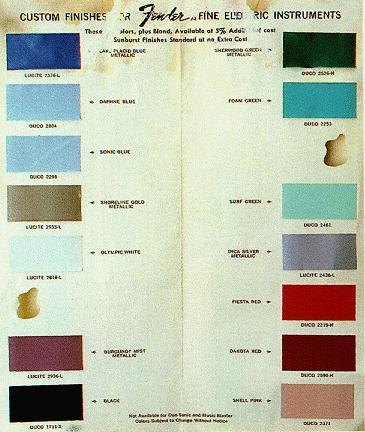
The first step was to look at the original Fender custom color charts. If you don't have originals to examine, use "the Fender Stratocaster" book (new edition) by A.R. Duchossoir, page 31. Thanks to the 1960 color chart, Fender provided us with the manufacturer, type and paint code for every color on this chart (though it's not obvious).
Take the first color, Lake Placid Blue, for example. The paint type is "Lucite", which is DuPont's brand name for acrylic lacquer. The number, 2876L next to "Lucite", is the DuPont paint code identifying the paint formula for Lake Placid Blue (note some colors are "Duco", which is DuPont's brand name for their nitrocellulose lacquer).
If you bring the paint code 2876L to your local DuPont automotive paint dealer, you can identify which car originally used this color. In Lake Placid Blue's case, that would be a 1958 Cadillac color available in acrylic lacquer (Lucite).
But you say, "acrylic lacquer? I thought Fender used nitrocellulose lacquer?". Fender used both acrylic and nitrocellulose lacquer in the color coat. To understand why, we have to understand what the difference is between acrylic and nitrocellulose lacquer.
What is Lacquer?
-
Paint is made of three major components: pigment, binder (also known as
resin), and solvent. Pigment is the what makes the color. Pigments can be
organic or inorganic. Organic pigments, though more expensive, offer a
wider range of shades. Inorganic pigments are derived from various
metallic ores. For example, white is made from titanium dioxide, black is
carbon, zinc is yellow, orange is molybdate, and red is made from iron
oxides.
Pigments are dispersed in binders, often called resins, which provide the protective and mechanical properties of the paint film. As paint dries, the binder forms a film that allows the paint to adhere to the surface. Early binders were made from natural materials such as linseed and soybean oil. These are still used in many oil-based house paints today. But natural binders quickly gave way to synthetic binders, which comprise 90% of the market today. These synthetic binders include alkyd (made from acids), celluloid, acrylic, epoxy, and urethane to name a few.
The pigment and binder dispersion is dissolved in a solvent, which controls the consistency of the paint and evaporates after the paint is applied. Without the solvent, the pigment-binder mixture would be too thick to spread easily and uniformly.
Nitrocellulose lacquer uses a celluloid-based binder. Acrylic lacquer uses a acrylic-based binder. Both use acetone as their solvent, which is what defines these products as lacquer. Acetone is an extremely fast evaporating solvent. That's why lacquer became so popular. It dries very fast and gives excellent gloss. Quick drying time is important for production environments such as car and guitar manufacturing because time is money.
Since nitrocellulose lacquer uses celluloid as its binder, there are some problems. Celluloid is the same material used for tortoise shell pickguards on D'Angelicos, Gibsons, Epiphones, Gretsches and other guitars from 1900 to present. And we all know what happens to those old pickguards made of celluloid - they turn to dust with time.
The Automotive Paint Industry in the mid 1950's
-
Nineteen fifty six was a big year for the automotive paint industry.
Prior to 1956, all General Motors (GM) cars were painted with
nitrocellulose lacquer (all other car manufacturers used enamels except
GM). GM liked lacquer. It dried fast, looked great, could be rubbed-out
to remove minor scratches and dullness, and it spot repaired easily.
Enamels looked dull in about the same time as lacquers, but you couldn't
easily rub them out to get the shine back. And the dealers and body shops
loved lacquer for the ease of application and drying time.
-
But the problem with all paints (mostly lacquer, but also enamel) at the
time was color retention. The resins used in nitrocellulose lacquer were
celluloid based, and promoted quick color fading (enamel's resins at the
time were alkyd based). The celluloid-based binder in nitrocellulose
lacquer had more problems because it yellowed and "checked" with time
("checking" is the term for slight finish cracking due to brittle paint). So
if you bought a new 1955 Chevy in pastel red, by 1958 it could turn to a
coral pink (red is the most photo-reactive color) and checked.
Also, nitrocellulose lacquers "yellowed".
This could change an original blue finish to a green.
GM wanted answers to these lacquer problems, and they turned to DuPont.
(In 1917 DuPont began buying an interest in General Motors Corporation
and owned 25 percent of the stock at the end of 1925. In 1962, after 13
years of antitrust litigation, DuPont was ordered to divest itself of GM
stock.)
In 1956 DuPont started using acrylic binders in their lacquer. This solved the yellowing problem, and to a large extent, the color retention problem too (acrylic is more UV resistant than celluloid). Also, since acrylic binders have better elasticity, the checking problem disappeared too. The only down side to acrylic lacquer is, to some, a myth. That is it never dries as hard as nitrocellulose lacquer (hence no checking problems). And since it doesn't dry as hard, it doesn't buff and shine as well (many, mostly in the paint industry, dispute this, but as a painter I agree). Any old-time car painter will argue this to the death.
1962 Stratocaster in Olympic White.
No clear coat, sunburst undercoat.
-
With DuPont's success in acrylics, by 1957 Ditzler and the other automotive
paint companies also started to convert their GM lacquer paint lines to
acrylics. By 1959 all new GM colors developed were acrylics. Ford and
Chrysler colors didn't switch to acrylics till 1962, and Chrysler colors
were available in both acrylic and nitrocellulose into the mid 1960's.
Ford and Chrysler cars were factory painted in enamel, so converting the
lacquer lines to acrylics was less of a priority.
GM colors that were originally created as nitrocellulose formulas, stayed as nitrocellulose. Nitrocellulose paint was available until the 1970's, when all the automotive paint companies eventually abandoned it. Unfortunately, 90% of the original 1950's GM nitrocellulose colors were never translated to acrylic formulas. The reason? The ten year window of planned obsolescence. The paint industry figures if your car is more than ten years old, they have no responsibility to provide replacement paint for it. One reason for this was the complexity of selling multiple paint types.
Paint manufacturers supplied their dealers with "tinting" colors for each type of paint. There were about 30 or more different tints per paint type, mounted on a rotating paint jig. All colors are derived from mixing these tints using the formula provided by the manufacturer. This means there was a mixing jig for nitrocellulose paint, a mixing jig for acrylic paint, a mixing jig for enamel, etc. And as new colors were developed, new tints were added to the mixing jigs. This took up a considerable amount of space in a paint shop, not to mention the expense for the mixing jig and all the tints required.
There was also the problem of organizing the paint formulas for each type of paint (they didn't have computers to store the formulas in the 1960's). DuPont and Ditzler used a cumulative weight formula for their mixing. For example, to mix a pint of DuPont's Shoreline Gold, you put the empty pint can on the scale and zeroed it. Turning the wheel to the Red Gold tint, you added this color till the scale hit 5.5 grams. Then you turned the jig to Black (High Strength) and added till the scale hit 16.5 grams. This continued with all the tints needed till you mixed 445.5 grams of paint, including all the colors, metallics and binder. If this finish was available in nitrocellulose, acrylic, and enamel, that meant there had to be three paint formulas for that one pint color. And there was a formula for a quart and a gallon too. That means nine formulas for a single color if it was offered in all three paint types! And there are thousand’s of colors.
Another concept that needs explanation is how paint manufacturers came up with their paint formulas. Usually, car designers created certain colors for certain car models. The color is then applied to a panel and given to each of the paint manufacturers. It's the responsibility of the paint manufacturer to develop their paint formula in the type(s) of paint they want to sell (only the OEM paint company is told by the auto company which type of paint they had to develop).
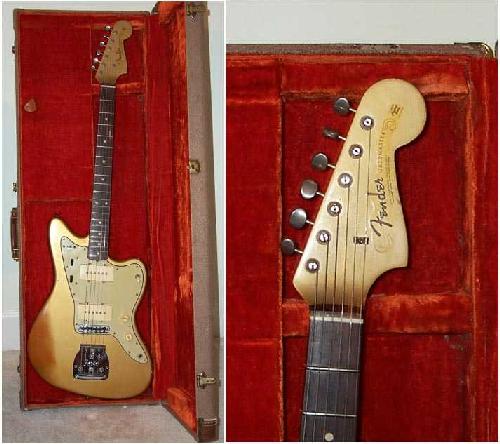
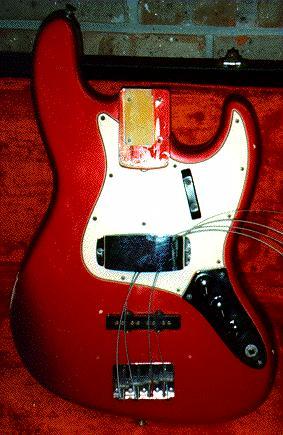
This gold Jazzmaster also identifies another thing about custom color models; pickguard color. The Jazzmaster (1959 and later), Jaquar and Jazz Bass all came with a tortoise-grain pickguard, if the body color was sunburst, blond, white or black. But if you ordered any other custom color, the pickguard would be white (or celluloid "mint green") instead of tortoise.
Because of this, Lake Placid Blue from Ditzler may be slightly greener than LPB from DuPont. The paint companies are expected to match the colors as best they can, but there was always visible differences in the same color from different manufacturers. The only thing the paint companies guarantee is that their tints will be consistent from batch to batch.
Because of problems having a color available in three or more paint types, manufacturers didn't want to keep old paint types any longer than necessary. For popular cars in popular colors, the paint companies would sometimes translate a nitrocellulose formula to an acrylic formula. But if a color was unpopular, or was used on an unpopular car, the paint companies wouldn't take the effort to do the translation. Instead they simply dropped the color when they dropped nitrocellulose paint.
Recently, PPG (Ditzler) wrote a computer program that translated the old original nitrocellulose formulas to acrylic tints. Then they searched their database of current acrylic formulas to find an existing acrylic color with the closest match. This is called an offset color. Sometimes they're pretty close to the original, but sometimes they're not.
1965 Jaguar, Olympic White
with clear coat, pickguard removed.
The Clear Choice.
-
Back to the issue of Fender using only nitrocellulose paint. What Fender
really did was use the colors as available from DuPont, be it acrylic or
nitrocellulose. But they always used clear lacquer that was nitrocellulose
based. Unfortunately for us trying to replicate these old colors, the
clear nitrocellulose lacquer yellowed significantly. This distorts the
shade of many colors, especially blue, silver, green and white (remember
from your high school art class that blue and yellow make green). On the
positive side, the nitrocellulose clear coat "softens" the color, making it
look warmer and less sharp. This is why most people like wood products
finished in nitrocellulose lacquer.
The cause of the yellowing clear nitrocellulose lacquer is largely, but not entirely, environmental. Ultraviolet (UV) light from the sun or fluorescent lights will accelerate the process. Air quality problems (smoking, smog) can also contribute significantly. But the nature of the lacquer beast is that nitrocellulose clear will yellow, to some degree, no matter how the instrument is stored. A case in point is the 1965 Olympic White Jaguar to the left. This picture was taken with the pickguard removed. Notice the yellowing of the exposed finish. But also notice the area under the pickguard is also still slightly yellow. And this area hasn't seen daylight since 1965 when the guitar was assembled by Fender.
-
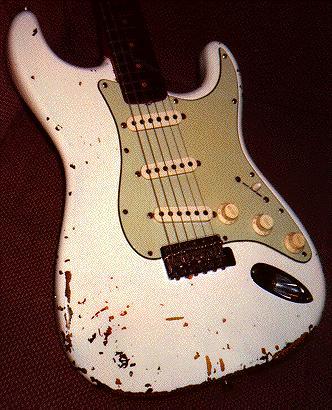
But Fender didn't always use clear coats on many custom colors. For example,
this fully original 1961 Olympic White Strat was not clear coated. How do you
know? No yellowing of the finish. I’ve also seen Olympic White
Strats that were clear coated, and hence very yellowed (mostly in 1964 and
later years). This provides some confusion because people try and tell you
the guitar is Blond, not Olympic White. This is because the yellowed white
does look similar to every late 60’s Blond Tele on the planet. But this is
easy to argue since we all know that Fender Blond finishes are somewhat
transparent showing the wood grain, and they are always over ash bodies,
not alder (more on body woods later). So there really shouldn't be any
arguements whether a finish is Olympic White or Blond.
Olympic White (no clear coat, no under coat)
-
In the case of blue, green and silver colors (like Lake Placid Blue, Ice
Blue, Firemist Silver, etc.), the yellow "clear" coat can distort the
original color significantly. This makes color identification difficult.
For example, is the original color Lake Placid Blue turned green, or Ocean
Turquoise? If the instrument is a 1964 model there is no question that
it’s LPB (Ocean Turquoise wasn’t available till 1965). But if the
instrument is a 1966 vintage, the original color may be more difficult to
diagnose since both LPB and Ocean Turquoise was available in that year.
The color identification problem is very problematic with metallic finishes. The reason is metallic finishes must always be clear coated, where the pastel colors don't require it. Since there are actual metallic particles (usually aluminum) in metallic colors, they will oxidize if they don't have a protective clear coat over them. This makes identifying the original color of an old metallic nitrocellulose paint job more difficult, due to the yellowing of the clear coat.
Colors that were not effected much from the yellowing clear coat are the reds (in the 1960’s these colors are often not clear coated anyway). Unfortunately, these colors are highly reactive to sunlight (photo reactive). This could help explain the "Coral Pink" or "Salmon Pink" syndrome. Looking at Fender's custom color charts from 1960 to present, you can see Fender *never* had a color called "Coral Pink" or "Salmon Pink". The only official pink Fender used was Shell Pink from 1960 to 1963, which is a very flesh-toned pink color. The "Coral Pink" and "Salmon Pink" guitars are probably Fiesta Red in which the red pigment may had faded. Since Fiesta Red has a large amount of white in it, if the red fades the white would bleed through thus creating a pink. More likely though, and what many don’t understand, original Fiesta Red is not really that red. From the can it’s a pinkish, (light) orange hue. Every "Coral Pink" or "Salmon Pink" Fender I've seen from the late 1950's and later was actually Fiesta Red. I'm not saying "Coral Pink" doesn't exist. Perhaps it was a true custom ordered finish, not from the offered Fender custom color chart. Just people hear "red" in the name "Fiesta Red" and expect a fire truck-type color. If you want a fire truck, look for Dakota Red, not Fiesta Red.
Also note that Fender did not always use Dupont paints for their guitars! The did always use Dupont's color codes and paint chips, but the paint itself came from a variety of sources, and was not always the Dupont brand. This could be another reason why the same color can look different on two different Fender guitars.
-
When Fender switched to Alder (from Ash) as it's primary body wood in
mid 1956, many books and authorities
state Femder started using a product called "Fullerplast"
This is a very misunderstood product.
For example, there is a picture in Tom Wheeler's
American Guitars, page 54 (upper left corner), of a man with long
rubber gloves dipping bodies into a tank at Fender in the late 1950's.
The description incorrectly denotes the man is applying "Fullerplast" to the bodies.
Most likely, this man is staining the Alder bodies yellow, a process
used on Alder from 1956 and later before spraying the sunburst finish.
Right forearm wear has shown Fender's first
attempt at painting this body in sunburst.
-
Fullerplast is a clear, sprayed chemically curing sealer, unaffected
by solvents after it dries. It is made by Fuller O'Brien (1-800-368-2068),
hence the name "Fullerplast"
(and all this time you though it was named after the city of Fullerton,
the home of Fender). Fullerplast soaks into the wood and creates a
seal that prevents following coats from soaking into the wood like a
sponge. This means spraying the color coats is easier and the coats
can be applied thinner (saving material, money and dry time).
Even though alder is a "closed pore" wood, the first
few coats of lacquer will soak in like a sponge without some type of
sealer coat. Fullerplast dries in 15 minutes, and is paintable in one
hour. It is also applied very thin.
Most experts agree the actual product "Fullerplast" (as made by Fuller O'Brien) actually started to be used around 1963 at Fender. Prior to that, Fender used other products as their sealer coat, but they did the same thing. The sealer allowed any color coat (be it sunburst or a custom color) to not soak into the wood. Since the sealer is essentially a clear inexpensive primer, less color would be needed (and color costs a lot more money than a cheap sealer).
Another misconception about Fullerplast is it's color. The sealers Fender used including Fullerplast was clear, not yellow. The yellow seen in the unpainted portions of a 1956 and later Alder body is actually a stain or dye applied under the sealer coat. This was used to simplify the sunbursting process. The Alder bodies are dipped in a vat of yellow stain/dye. Next the Alder body is sealed with a very thin coat of clear sealer (i.e. "Fullerplast"). After drying, the sunburst procedure is continued by spraying the translucent red (starting in 1958) and dark blackish-brown on the edges of the body, which completes the sunburst look. Finally a clear coat is sprayed over the entire body to seal the colors. By dipping the alder bodies in a yellow stain first, instead of spraying yellow lacquer, there is one less step of lacquer to mix, spray, and dry. *
By fall 1964, Fender changed the yellow making it more whitish and opaque to better hide flaws in the wood. This allowed Fender to use cheaper Alder (and smaller multiple pieces) with more cosmetic flaws. The more whitish yellow was then sprayed over the sealer coat, as were the red and brown of the Sunburst. That is why the red and yellow now looks much different on late 1964 and later Fenders. This new whitish-yellow bleeds through the translucent red making it more orangish. Note that even though Fender was now spraying the yellow after the Fullerplast, they still continued to stain or dye the bodies yellow before the sealer coat.
Note in the mid-1960s occassionally Fender would make alder Strat bodies that were well book matched. That is, the glue lines between the multiple pieces of Alder lined up well, making the body look like a single piece of Alder. In these cases sometimes you'll see in black pen "no fill" underneath the pickguard, under the finish. This told the painters not to spray the opaque yellow on that particular body. If you find one of these mid-1960s Strats, usually the sunburst is much nicer than the "normal" yellow opaque sunburst Strat body.
Early (1954 to mid-1956) Ash bodies in Sunburst were done differently. In this case, the yellow is not stained, but is sprayed like a Gibson-type Sunburst finish. That's why 1954 to mid-1956 Fender Ash body Strat sunburst's yellow looks "brighter" than later Alder yellow stained Sunburst finishes. This process created a lot more production work. Not only was the yellow sprayed, but the Ash body also had to be "pore filled" (sealed) before spraying the Sunburst. Since Ash is an "open-pore" wood (unlike Alder), not using a pore-filler sealer leaves a final finish with considerable "sink". This occurs when the finish dries and sinks into the open pores of the wood, leaving a finish with many dimples. To stop this, a pore filler consisting of fine sand mixed in a thick solution is brushed (or sprayed) on the bare wood. After some dry time, the excess pore filler can be scraped or wiped off leaving material in the pores of the wood, thus filling them. After some more dry time, the body can be sealed with lacquer and the color finish can be applied. This process was always used by Fender on Ash bodies from 1950 to the present.
Note there is an exception to the sprayed yellow sunburst rule in 1954. The first two months of Strat production (March-April 1954), there was NO yellow in the sunburst! The two-tone sunburst's center area was actually just a natural Ash wood color, making a "one-color" sunburst. The amber brown of the sunburst was sprayed around the edge of the body, leaving the natural Ash center as the "yellow" part of the two-tone sunburst. This changed by May 1954 to having the yellow center of the sunburst sprayed, giving a more vibrant sunburst finish.
Back to the yellow stain in 1956 and later. Since it was used for Alder Sunburst bodies, sometimes you don't see it on custom color finishes. But again, most times you do. Fender was a production shop that produced mostly Alder Sunburst finished bodies. Hence they just stained all Alder bodies with the yellow, allowing them greater production flexibility. Therefore most custom color bodies have a yellow stained body too. After all, you're not gonna see the yellow on a custom color body, so what's the difference? Fender just stained all Alder bodies yellow and figured out later which ones would be custom colors. Again, in most cases Fender also still used a sealer ("Fullerplast") in custom color finishes too. The custom color spraying process wasn't different from sunbursting till after the sealer step. This simplified the production process, and made Fender quick to react to market demands for Sunburst or custom colored bodies.
During 1963 and 1964, when guitar production was really high, bodies destine to be a custom color often didn't get the yellow stain, Fullerplast, primer, and clear coat procedure. After all, if the shop was really in a hurry it can just spray the color coat right over the Alder without any preparation paint (if need be). All they did was spray more color coats (especially if a clear coat wasn't used). This would cost more in materials (custom color paint was the most expensive paint Fender used), but it sure was quick. And often, they didn't even clear coat the color. This was truly a "rush" paint job.
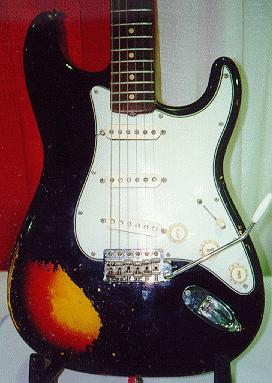
Some colors were really prone to "short cutting" by the Fender factory. For example, Sonic Blue (and to a lesser extent, Olympic White) often do not have the yellow stain. In the case of Sonic Blue, this might have happened because the yellow stain was bleeding through to the blue. Other pastel colors were also shorted cutted, having no yellow stain, no Fullerplast, and/or no clear coat.
Metallic finishes didn't come out well using this "short cut" technique. Without a clear coat, metallic colors can oxidize due to the metal particles in the finish. And it's difficult to apply metallic coats very heavily. Hence most metallic finished bodies went through the whole production process, and got the yellow stain, Fullerblast, undercoated, and a clear coat.
Dakota Red rushed (left, no yellow stain, no
Fullerplast, no undercoat, no clear coat) &
Candy Apple Red (silver undercoat)
Fender Primer Undercoats and Sunburst Undercoats
-
Fender was inconsistent in using undercoats on their custom color
finishes. During the 1960's, if there is an undercoat it is usually a
white primer undercoat.
And most often you see this white primer undercoat on metallic finishes such
as Lake Placid Blue or Burgundy Mist. The pastel colors like Dakota Red,
Daphne Blue, Foam Green and
the like don't often use an undercoat coat either. But then again,
sometimes they do. In the Fender production shop, it all depends on where
the custom color order fell in the production schedule. If Fender had the
time to use undercoat, they did. If they didn't have the time or were
backordered, they didn't bother with an
undercoat (depending on the color).
Undercoats were used on guitars for different reason than on automobiles. On cars, a primer undercoat is used to increase the adhesion of the color coat to the metal. It is also used to fill imperfections in the metal. And finally, special primer undercoats are used on metal for rust prevention. But on wood, none of the above undercoat properties are needed. Imperfections can easily be sanded out with sandpaper. Lacquer already adheres well to wood. And there is certainly no problem with rust.
So why bother with an undercoat on guitars? The reason is purely financial. In today's prices, white nitrocellulose primer undercoat costs about $15 per gallon. Any of the Fender custom colors cost about $15 per pint, with reds costing $20 per pint. So if you use the white primer to cover the wood and make the body a consistent white color, you can use about half as much color paint for a uniform top color. This could save a considerable amount of money when painting thousands of guitars. Of course the financial disadvantage to using an undercoat is it takes more time. You have another step where you have to let the body dry. So when the production schedule allowed, Fender used an undercoat. When things were rushed, Fender didn't.
Fender also used Sunburst (or other colors) as an undercoat to custom colors. Fender probably had an ample supply of reject Sunburst (and custom color) finished bodies that had some flaw (remember, all these guitars were painted by humans, not machines). It can be assumed that the majority of custom color finishes over other finishes are probably rejected bodies. Stripping an existing bad finish to apply another is just too much work. So shooting a new custom color over a bad finish would be killing two birds with one stone. You use up those bad Sunburst bodies without stripping, and charge 5% more for the new custom color to cover the cost of painting the same body twice (or more).
over Dakota Red (darker Red), over white primer,
over Sunburst, over Fullerplast & yellow stain.

-
And sometimes Fender did all the above: sprayed a custom color over a
white primer undercoat, over a Sunburst finish. A case in point would be
the 100% original 1961 Fiesta Red Strat to the left. It's Fiesta Red, over
Dakota Red, over a white primer undercoat, over Sunburst!
It was probably just a series of bad paint mistakes.
Fender started with a "bad" sunburst body, then sprayed a white primer
undercoat (to save expensive red paint). Then they sprayed the Dakota Red
(without a clear coat), and probably accidentally buffed through the red.
So Fender just sprayed the Fiesta Red right over the Dakota Red (maybe
Fiesta Red was already in the spray gun that day). No clear coat was used
over the Fiesta Red either.
(Some people may argue this guitar may have been special ordered Fiesta Red, and was mistakenly sprayed Dakota Red. I would argue this line of thinking. If that was the case, it would have been cheaper for Fender to just spray another body Fiesta Red and sell the Dakota Red guitar to another dealer. Respraying another color over a perfectly good finish because it was the wrong color wouldn't make financial sense. And Leo Fender was very cost conscience, so mistakes like that just wouldn't be made.)
Another case is an original 1962 Olympic White Strat I once owned. It too was sprayed over Sunburst, but with no white primer undercoat. In this case, Fender was probably using a "bad" Sunburst finish as its undercoat, and maybe this was a "rush" job. If Fender had a dealer order for a custom color, it was much quicker to spray a color over a full prepared and painted body then it was to paint raw wood. The product could be delivered faster, hence happier dealers and customers. And there was probably always an ample supply of (rejected) sunburst bodies. So Fender used the sunburst bodies as the undercoat and just sprayed the custom color right over the sunburst. Because if you're in a hurry, it's quicker to shoot a finish over an existing leveled and smooth finish than shooting bare wood. And if you're not happy with the existing Sunburst finish, you're solving two problems. As for the lack of a primer - shooting a white undercoat under an Olympic White top coat doesn't save you much (if any) paint (though Fender sometimes did it).
Yet another (lack of) undercoat example is the 100% original 1964 Strat pictured above. It had a Dakota Red finish over nothing! No Sunburst, no white undercoat. The standard yellow stain and "Fullerplast" was even missing. And there was no clear coat over the Red. This was truly a Fender "rush" job. They just shoot the Red right over the wood, rubbed it out and called it "good".
Undercoats in the 1950's were even more inconsistent. Again, sometimes they used them and sometimes they didn't. And the color of undercoat was inconsistent too. It ranged from off-white to Desert Sand (the DuoSonic/MusicMaster color) to even silver. Again, usually the pastel colors like Dakota Red and Black often didn't use any undercoat. And Sunburst is also seen under some 1950's custom colors. Probably just an easy way to use up those bad Sunburst bodies without stripping them.
Some general rules can be said about undercoats used with custom colors during the 1950s. During 1954 and some of 1955, Fender used a silver metallic undercoat beneath their custom colors. Then during 1955, that undercoat changed to a white (seemingly the same finish used on native blond Telecasters). Also Desert Sand was also sometimes used as an undercoat. It doesn't take much to imagine why Fender used white and Desert Sand for undercoat colors - heck the spray gun was already loaded with those colors (for Telecasters and Musicmasters/Duosonics), so just use those colors as the undercoat. Less production time in changing gun colors, less cost in stocking a unique primer.
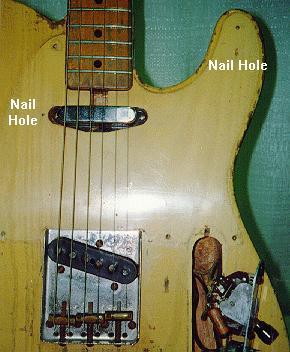
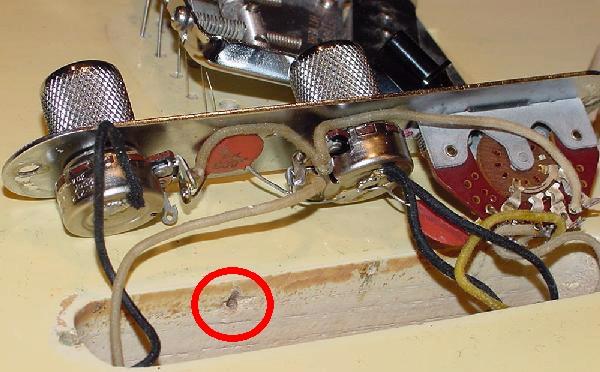
The Nail Holes and the Paint Stick.
-
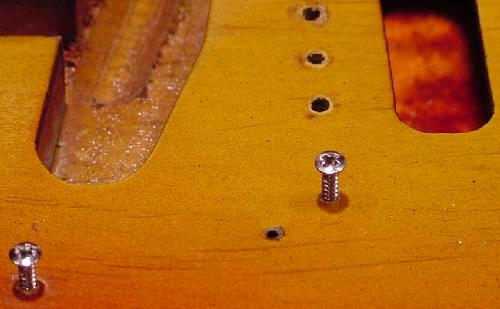
For completeness, we should talk about the body "nail" (or "pin") holes under the
pickguard on Fenders. These small (approximately 1/16") holes were
actually made from nails. These nails were hammered into the front
of the body just prior to painting. Fender used these nails
as "legs" to suspend the body above the spraying and drying tables.
This techniques was used until about November/December 1964.
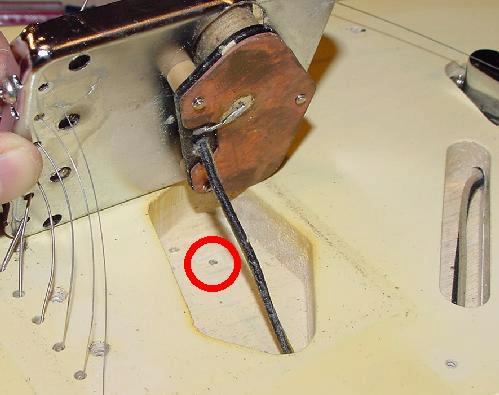
to show the shadow left by the "paint stick".
-
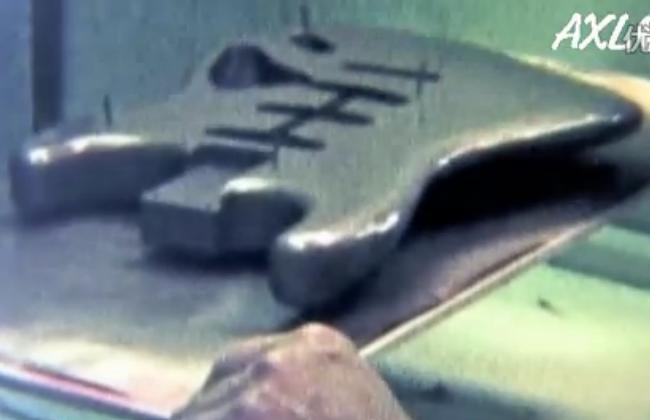
To the end of 1962, Fender would spray the front of a guitar body
first as it laid on top of a turntable. The turntable was a "lazy susan"
that allowed the body to be rotated without touching it. After spraying the
front, they would flip the body over onto these nail legs, and spray the
back and sides. When done, the body was moved to a drying area and left on
its nail legs to dry. When the finish was dry, the nails were removed and
the body was rubbed out and polished.
(lack of red) created by the nail, as the red was sprayed on the body!
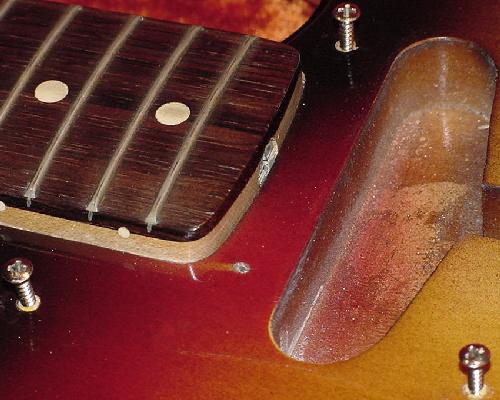
Starting at the end of 1962, Fender changed how they held the body when spraying it. Now they used a "stick" that was screwed in the neck pocket in the two bass-side neck pocket screw holes. The stick was a jig that suspended the body and allowed it to be rotated in the spray booth for easy spraying. Because the stick was now used, the area under the stick in the neck pocket does not have any paint. Hence you only see the yellow stain used for the first step in the Sunbursting process under the stick. But note, the nails were still used even after the stick. Now the nails' sole purpose was to suspend the body while drying. Note prior to the "stick", Fender neck pockets on Sunburst and custom colored bodies are entirely painted.
The "stick" in reality was not really a stick at all. Fender actually used inexpensive electrical pipe conduit as the "stick". One end of the pipe was beaten flat with a hammer, and attached to the body. The other end of the conduit was slide onto a small metal rack (also made of conduit) sitting on a table in the paint booth. This way the body could be painted "hands free", and rotated on the metal holding rod, or the whole rack could be turned, allowing easy painting of the face, back, and body sides. A picture of this can be seen in Tom Wheeler's American Guitars, page 54 (lower left corner), or in Tom Wheeler's 2004 book, Stratocaster Chronicles.
jack plate mounting screw.
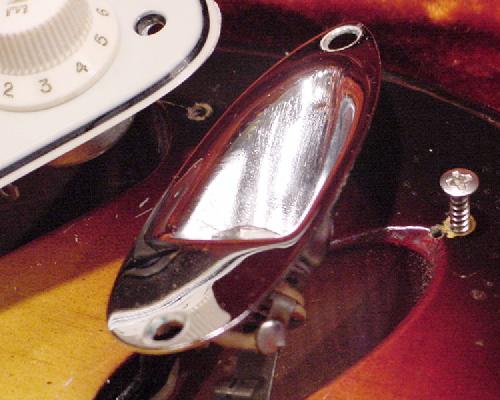
Because the "lazy susan" paint method was used till the end of 1962, the neck pocket should be fully painted (because the nail legs where utilized during painting). Starting at the end of 1962, the neck pocket should have an area on the bass side void of any paint (but still stained yellow before painting) where the "stick" was attached during painting.
It is very important to note that the nails were still used on Fender bodies, even after the implementation of the "stick". But the nail's sole job now was to provide a way to set the body down to dry, without anything touching the paint. Fender maintained this technique of using the nails until the end of 1964. At this point Fender implemented a "drying tree" to hold bodies as they dried. This approximately six foot high device could hold about 40 bodies while they dried, while using very little physical space. With the implementation of the drying tree, there was no longer a need for nails. There is a picture of the drying tree in A.R. Duchossoir's The Fender Telecaster, page 57 (upper right corner) and in Tom Wheeler's Stratocaster Chronicles book.
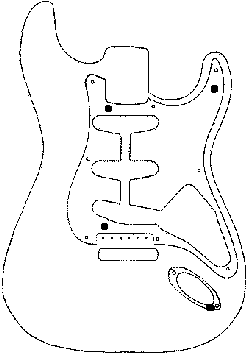
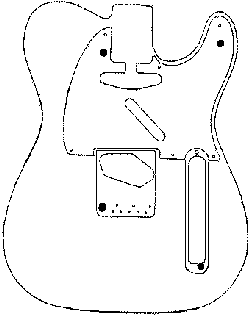
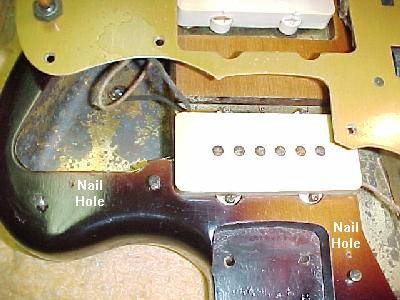
The large black dots shows the approximate location of the nail holes used
from 1951 to 1965 Fender Stratocasters and 1951 to 1958 Telecasters. The lines
represent the body routes and pickguard/control plates. Note the placement of
Broadcaster nail holes is slightly different than 1951 to 1958 Telecasters.
Also note on Strats, sometimes only THREE nails were used (the treble horn nail
hole can be missing). Also on Strats, sometimes the jackplate nail hole can be
located just inside the pickguard mounting screw closest to the jackplate. On
1958 to 1964 Telecasters the nail hole locations are slightly different.
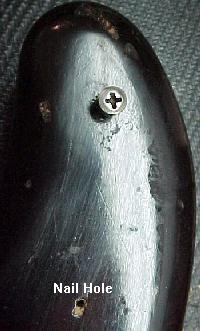
Left: 11/2/50 Broadcaster #0038 showing two of its nail holes.
One next to the neck pickup and the other on the cutaway below the pickguard screw.
Right: A 1954 Stratocaster showing a nail hole on the treble horn under the pickguard.
A 1958 Jazzmaster showing two of its nail holes under the pickguard.
-
When trying to identify an original Fender finish till late 1964,
these nail holes should be clear of paint.
The reason is the body was sprayed with the nails in place and used as
spraying and/or drying legs. The nails aren't removed till after the
finish has dried. But since the body was rubbed out after the nails were
removed, these holes may have some white or pink rubbing compound or other
junk in them. But there should never be any paint in the holes! Also
note in the above diagrams the location of the nail holes. This was
purely a manual job, so this is just an approximation of location.
Since the nail holes were created by some guy armed with a hammer and nails,
the exact location of the holes varies slightly from guitar to guitar.
But notice a rough rectangle is produced by the location of the nails,
giving the body good support while being sprayed or dried.
and this is a frame showing a custom color Stratocaster being painted.
Notice the "lazy susan" that the body sits on, and the nails sticking
upward, waiting to be utilized when painting the back side of the body.
-
Note the picture of this November 2, 1950 Broadcaster body (#0038).
The nail hole next to the pickup is in a slightly different location
than 1951 and later Telecasters. The nail hole on the cutaway
(below the pickguard screw) is in the typical Tele position.
Interestingly, on this Broadcaster the nail was cut off next
to the pickup and remains in the hole!
Also sometimes a seemingly "three legged stool" approach was taken. That is, only three nails holes can be found, instead of four. This happens often because a pickguard screw takes over the original nail hole. I see this on Stratocasters in particular, more than the other models. On Strats, the treble horn nail hole is the one often not found. This is also seen on Telecasters after 1958 too (see note below). In this case I believe the fourth nail hole has corresponded with the cutaway pickguard screw hole. That is, the nail hole has been over taken by the pickguard screw hole, thus hidding it forever. At first I thought Fender was taking a "three legged stool" approach to painting. But if you have ever tried this, it really just doesn't work, as the body is too unstable to paint. Also note on Strats, sometimes the jackplate nail hole can be located just inside the pickguard mounting screw closest to the jackplate.
For some reason in 1960, Fender moved the nails to inside the routed
cavities on the Telecaster.
-
Also the position of the Telecaster body "nail holes" moved.
Around 1958, the nails were moved
to inside the body routes, like inside the neck pocket or truss rod adjustment route,
inside the bridge pickup route, and inside the wall of the control cavity route.
Why this was done I am not exactly sure (it wasn't done on the Strat).
Also the fourth nail positioned on the cutaway was dropped.
This was also seen on a May 1959 Tele Custom (which at first I didn't
think had any nail holes!)
-
In the early 1960s, due to the popularity of Hank Marvin of the band the Shadows,
the Stratocaster was THE guitar to own in the United Kingdom.
In 1961, Fender was imported by Jennings (the makers of Vox amps),
and in 1962 Fender was also imported by Selmer.
Both Jennings and Selmer gave way to Arbiters as the sole
UK distributor in the Summer of 1965 (perhaps because Fender didn't like
having their products distributed by successful UK amp makers).
But all the importers seemed to have brought Fender guitars into the UK *without* cases,
probably because local cases were available for less money than the
Tolex Fender cases (the Canadian Fender importers did the same thing).
This in turn increased the possibility of damaged finishes as the guitar
were imported into England, which helps lend itself to the following story.
Urban legand has it that English guitar shops found it easier to sell guitars that looked like Hank Marvin's Fiesta Red Stratocaster, than the standard sunburst finished Strat. Therefore, a lot of Fender Strats were rumored to be refinished from Sunburst to red on arrival in the UK to match Hank Marvin's guitar. The resulting color used by the Fender UK importers was not as red as Fender's factory "Fiesta Red", and was more of a "Salmon Pink" color. This of course added more to the confusion about what exactly Fiesta Red was, and the Salmon Pink color rumor.
Most of the red UK painted Strats where done right over the original sunburst. Also the UK painters did not seem to use the "nail hole" method of painting these guitars (lucky for us). Hence these 1960s refinished-when-new UK Strats will usually have painted nail holes, red-over-sunbuarst, and non-Tolex/weird cases. Therefore they are pretty easy to identify.
So is this "English refinished Fiesta Red" story rumor or fact? I personally tend to believe the story, as I received an email from an english gentlemen that claimed he worked for Selmer in the UK, and he in fact did some of the refinish work. I also owned a red-over-sunburst 1961 Strat in a Selmer case. But that's the only real proof I have that the story is true. Otherwise the jury is still out on this. But if the story is true, regardless, these English-refinished-red Strats are *not* factory original Fiesta Red guitars, and hence must be considered a "refin". Now if the nail holes are clear and present, I would consider it "original". But if there's no nail holes (or painted nail holes), by definition it's refinished and not original.
-
Another thing to consider when trying to determine original custom color
finishes is the solder joints. Personally, I don't buy custom
color Fenders if a solder joint has been disturbed. The reason? Well you
can't refinish a guitar if you don't take it apart, and hence resolder the
guitar somewhere (except on a Jazzmaster).
If it's obvious the solder joints are old and look
neat, than it's probably original. So please don't replace that dirty
volume pot on your original 1963 Fiesta Red Strat. You could be devaluing
your guitar by 50%!
- Unsoldering a pre-1963 Strat pickguard at the output jack only. So when the unsuspecting buyer looks under the pickguard, all the solder joints look original. Note that starting around 1963, the Tremolo ground wire goes to the volume pot casing instead of the output jack ground. Hence 1963 and later Strats must be unsoldered at the volume pot (or tremolo claw and output jack) to take them apart. Hence this trick won't work on 1963 and later Strats.
- Using Navel Jelly on fresh solder joints. Some bogarts will resolder carefully and remove all the flux. Then they'll put a little Navel Jelly on the fresh solder joint for a few minutes. This will "cloud" the solder joint, taking the shine off and making it look old.
- Pushing the cloth shielding back. Some tricksters push the cloth shielding back on cloth wire (used on pre-1968 Fenders), and then cut the bare wires about 1/2" from a solder joint. Then after refinishing, the wires can be carefully re-solder, and the original cloth shielding pushed back over the re-attachment point. This leaves the original solder joints untouched and looks like nothing was ever resoldered.
Be aware there are bogarts out there playing some solder joint tricks. This would include:
Gentlemen Prefer Blonds (Ash Bodies).
-
When looking at custom colored Fenders, keep in mind what wood the body is
constructed from. After mid-1956, all custom colored Fenders (except
Blond and the 1963 red mahogany-body Teles) should be Alder, not Ash.
This applies to Teles, Strats,
Jazzmasters, everything. But right now I bet you're thinking, "hey, aren't
pre-CBS Teles always made of Ash?". The answer to this depends on the color.
I believe the reason the majority of Telecasters and Esquires are made of Ash is because their standard finish was blond. They aren't made of Ash just because they're Teles. Fender Blond finishes, because they are translucent, are always painted over Ash. Any other finish (after 1956), uses Alder. The reason is purely time and money. Ash, because it requires the additional step of "pore filling" (see above), requires more time and work to paint. That's why Fender switched to Alder in mid-1956. Alder is just a lot easier and cheaper to paint.
To confirm this just look at the Telecaster Custom, which was introduced in mid-1959. This was the first "standard" production Telecaster with a Sunburst finish. And these are all made of Alder, not Ash.
A conflict to this would be the (rare) Sunburst Telecasters made after mid-1956, which should have been constructed of Alder. I've only seen one, and it was made Ash. The only reason I can come up with is that at the time there were no "standard" Telecaster models being produced in Alder (the Tele Custom wasn't introduced till 1959). Hence, Fender just didn't have a stock of Alder Tele bodies around from mid-1956 to 1959. So if you wanted a custom color Tele prior to mid-1959, there's a good chance it's made of Ash. Because switching Tele production to Alder for a short production run may have not been cost effective. But after mid-1959, all custom colored Teles (except Blond) would be painted over Alder as Fender was making standard models in both Alder and Ash.
Strats are a different story. After mid-1956, if it's a custom color other than Blond, it's got to be an Alder body. Since after mid-1956 Strats "standard" body wood was Alder, you only see Ash bodies on Blond models.
What this translates to is this: if you see a 1961 Telecaster or Stratocaster in Fiesta Red over an Ash body, it's refinished. Check those nail holes and solder joints. If they aren't correct, keep your money in your pocket and walk away. Even if they seem right, I would think hard before laying down my hard-earned money.
-
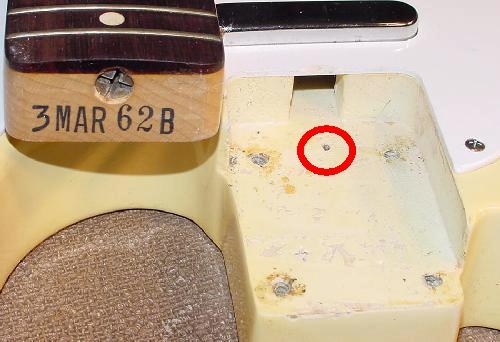
Another Fender misconception is the "big number stamp" seen on many custom
color instruments. These large, 1/2" letters/numbers are under the pickguard
(on a body), and also usually on the heel of a neck (between the 4 bolt
holes), stamped deeply in the wood.
I've seen this on instruments as early as 1959, and as late as 1966. These
large, stamped numbers sometimes denote a guitar as having some factory repair
work, usually refinishing. The reason
Fender used this stamp was very simple. Due to the large number of bodies
and necks being painted at any one time, they had no way of keeping track of
a particular guitar unless they marked it. If it was back for a refinish
(a service Fender offered till the late 1960's), they would serialize
the body and/or neck with this large, deep stamp. This allowed the guitar to
be stripped and sanded without losing it's ownership.
Then it could be put into the paint production system to be painted as if it
was a new guitar. After the paint process was done, the large deeply stamped
numbers would allow Fender to "find" the refinished parts and re-assemble
them, and ultimately return them to their owners.
1962 Sonic Blue Stratocaster. Note the "S.B.3" burned into the finish with a
soldering iron. Often Fender did this when disassembling a guitar to be refinished.
The funny thing about this guitar is the markings are *on top* of the paint (the
paint should be over the markings - why would Fender need to identify the body
and color *after* it was painted?) For this reason I have doubts about the
originality of this finish.

-
I have to admit, I've seen these stamps on guitars and it was quite difficult
to completely verify it as a factory refinish. The guitar looks stock, and
it sure looks like an original Fender paint job (Fender did the
finish after all). The guitar could well be factory original, especially if the
number stamp is just two letters. But if the guitar has 4 or 5 digit number
codes, then it's best to evaluate the
whole guitar. Do all the attributes of the guitar measure up? For example,
if the neck is a small peghead and a slab fingerboard (meaning 1959 to 1962),
yet it has a black thick "Fender" peghead logo, the large number stamps indeed
confirm the guitar was factory refinished. Check for other things too.
The nail holes will probably
be intact on a factory refinish before 1965, so check the
solder joints. Yet if Fender did the unsoldering
and re-soldering of the wiring at the factory, it could look pretty
convincing as original. Other things to check are pickguard holes
(additional holes with paint in them) or other strange features that cross
years (like a pre-CBS Strat with 1966 pot date codes and a white not green pickguard).
work. This guitar has a 1960 dated neck, but with a
later 1964 to 1967 transition logo. The serial number and
electronics are 1966. Note the lack of "nail holes" on
this body, indicating 1965 and later. Also note the large
number stamps confirming a factory repair/refinish.
Photo: Dave Boze.
-
Other things to think about include:
evaluate the color and other details themselves.
Does this color make sense for the year of the guitar?
Or is it Ice Blue metallic on a 1963 guitar (when Ice Blue
wasn't even available till 1965)? And check the other specs. For example,
on the guitar pictured above it has a small peghead, clay dot neck with
a 1960 pencil date, but a mid-1964 to 1967 transition Strat peghead logo.
The serial number, pots and pickups all date to 1966. And the contours of
the body, color, and lack of nail holes also indicates around 1966.
So something clearly happened to this guitar in 1966, though it all appears
to be factory "stock". The way it looks is Fender refinished the neck
on the guitar, but replaced the body and electronics in 1966.
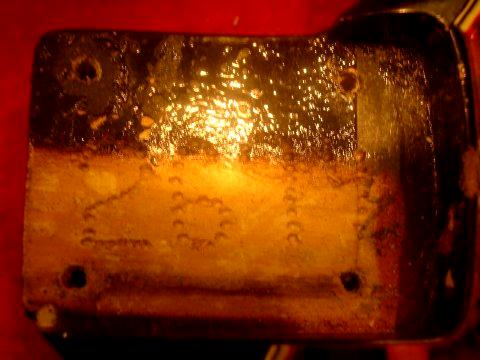
This 1966 Candy Apple Red (C.A.Red) Stratocaster was clearly sent back to the
factory for a factory refinish. The number codes are clear evidence of this.
This CAR finished used gold as the undercoat, which was standard practice
after 1965. Notice the different look than the silver undercoat CAR finish below.
-
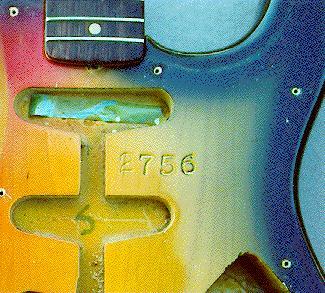
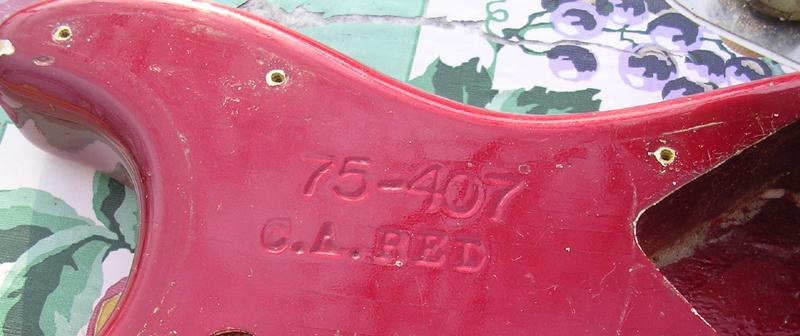
Other things to look for include "LPB" (Lake Placid Blue) and "CAR" or "C.A.Red"
(Candy Apple Red) burned into the body with a soldering iron tip or stamped,
and then finished over. These are for sure indications of a factory refinish.
Also if the stamped number is both on the body *and* neck, this is also
a sure sign of a factory refinish. Or the stamped 1/2" numbers
are the same as the guitar's serial number (or part of the serial number).
a special order or a show guitar. This does not indicate a factory refinish
job, but was instead used by the factory to tell the finish booth to paint this body
special order. Stamped number codes and letter codes mean different things.
This guitar was bought from the original owner, and has the original strings
and is in near-mint condition. Everything screams "original 1966" from the
peghead to the strap buttons. This guitar was either special ordered by the store,
or it was used as a Fender show guitar and later sold to a store. One thing
special about this guitar is the silver undercoat used for the Candy Apple Red
finish (Fender changed from silver to gold undercoat in 1965).
-
1966 and the "ES" Stamp.
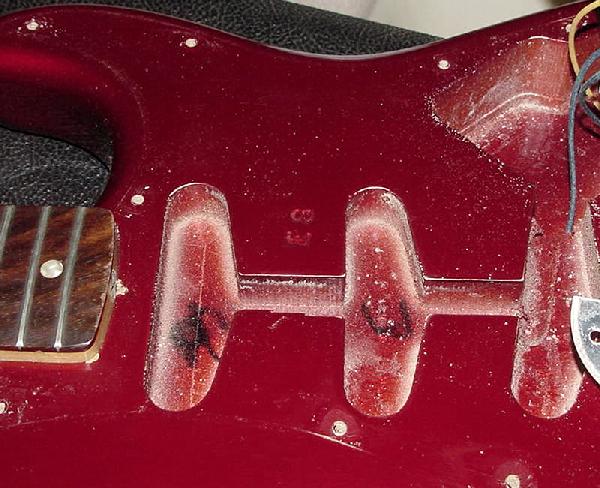
In 1966, Fender used the "ES" code a lot on their custom color instruments. At least for 1966, the ES code was used as some sort of default for custom colored instruments (be it Teles, or Strats or Jazz Basses). This two letters ("ES" for "Enter Special") seems to denote a special order, at least for 1966. Again this is has been seen lots of times on 1966 documented original custom color instruments. I have also seen the "ES" stamp on some 1966 sunburst instruments! (Perhaps these guitars were special show models, so extra care was taken in their finish.) The 1/2" tall 2-letter code were a factory color code, and are completely different than the 1/2" tall three-digit codes. The two-letter code appears to be CBS/Fender's way of specifying bodies to be painted a custom color for a special order once the body was in the spray booth. If a guitar has a two letter code on the body *only* (and not the neck), again this confirms the 2-letter code was an original factory color code (and does not indicate a factory refinish order). But then there is this question: why do only some 1965-1968 custom color Fenders have this two letter code and others do not? It may have to do with how many custom colored guitars were being painted at any point in time, and the 2-letter code was applied to avoid confusion. Or it was applied just for particular special orders (like a Fender NAMM show guitar or a special dealer/artist order).
The neck pocket on a 1963 Jazzmaster.
Fender's Original Colors.
-
Because over half of the fourteen original custom colors are Duco
(nitrocellulose) colors, most were not translated to acrylic formulas.
This means some colors were not available from the time Duco paint
disappeared (in the early 1970's) to the present. But during the summer
of 1996, the "lost" Fender colors were brought back by DuPont, but all
in acrylic lacquer and newer paint types. Prior to the summer of 1996,
I had to use other similar colors from cars of the same era that were
still available in lacquer.
-
Here are all the custom colors, their original paint type (remember, Duco
is nitrocellulose, Lucite is acrylic), the years Fender
used them, and what cars they originated. The "Car Year" column
represents the years this color was available for the Car Make listed.
Note some colors were also used on other makes within the same manufacturer,
but with different names and for different years. These colors will have
the same paint number, but a different paint name. See the individual color
descriptions for a list of these paint names.
Also note all metallic colors, except Candy Apple Red,
are single-step metallic colors. That is, the actual color and the
metallic particles are contained together in a single paint. This
minimizes the application steps.